How to check and adjust my valves on my TM Racing 250/300Fi ?

It's never been easier to check and adjust the valves on a tm 4-stroke motorcycle engine. Indeed, TM Racing SPA brought with the new TM Racing 250Fi engine block, now also available in 300Fi cylinder from 2020, a "mixed" timing chain/gearing, this system allows to check the valves of its tm engine without even need to remove the timing chain.

Here we explain you step by step the process you can do simply at home with a little need of tools. As a reminder, it is important to check the valve clearance of his tm racing every 20 hours approximately. A non-optimized valve clearance will shift the engine cycle by as much, and cause non-optimal performance.

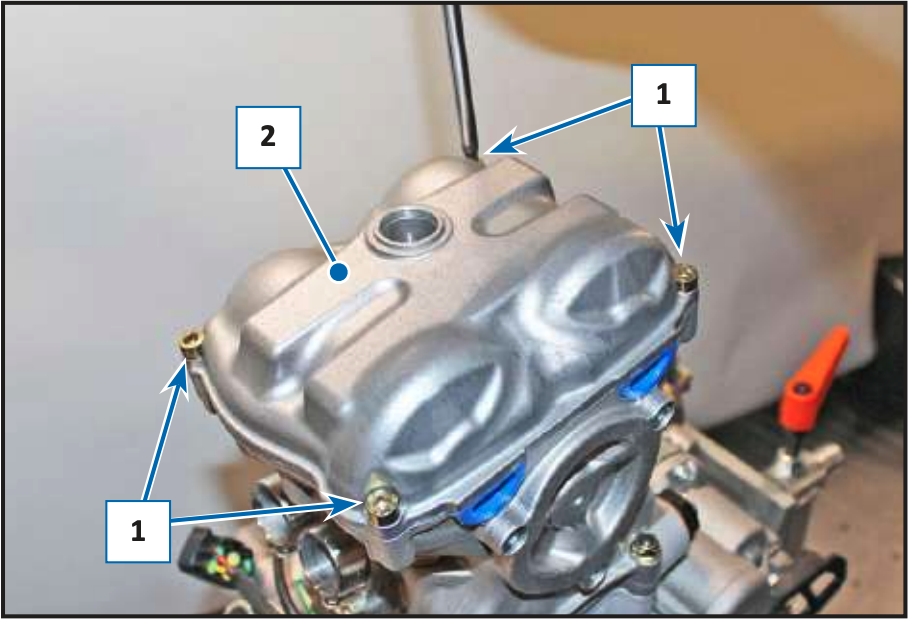
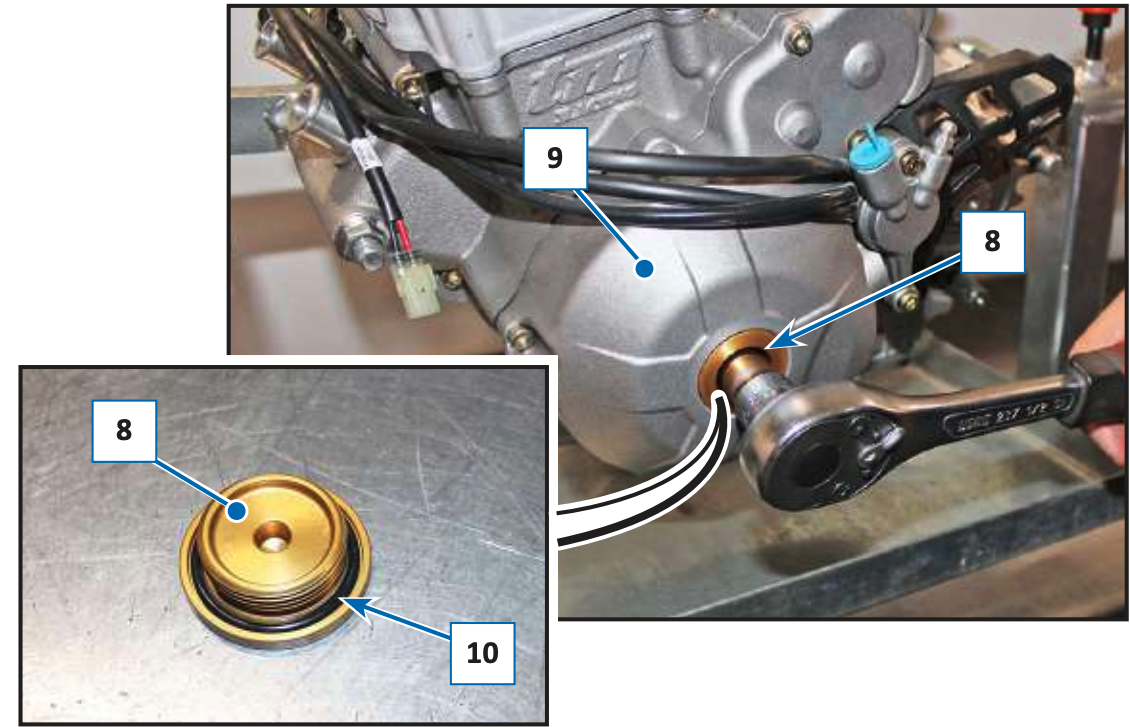
The process can be done with the engine in the frame, or on an engine support, in the case where the engine is in the frame of the motorcycle, it will first be necessary to remove the air box in order to have access to the cylinder head of your tm. For obvious reasons to facilitate photo-shooting, our tutorial is made with an engine on engine support.

Valve clearance TM Racing- Photo 1

1 - Unscrew the screws (1) from the head cover (2)

Valve clearance TM Racing - Photo 2

2 - Remove the cover (2) using the corresponding gaskets (3) and (4). Check the status of the gaskets (3) and (4), replace them if worn.

Valve clearance TM Racing - Photo 3

3 - If it has not been removed yet, remove the spark plug (5) using a special wrench (6).

Valve clearance TM Racing - Photo 4

4 - Mount a comparator (7) on the head with the following tool.

Valve clearance TM Racing - Photo 5

5 - Remove the cap (8) from the generator cover (9). Check the status of the gasket (10), replace it if worn. Position the gearbox in neutral.

Valve clearance TM Racing- Photo 6

6 - Using a socket wrench (11), turn the crankshaft to position the piston at top dead centre, as indicated by the timing points (12) parallel to the edge of the head present on the intake (13) and exhaust (14) camshaft gear.

Valve clearance TM Racing - Photo 7

7 - Remove the comparator (7).

Valve clearance TM Racing - Photo 8

8 - Use a thickness gauge (15) to check the play between the cams (16) of the intake camshaft (13) and the valve pad is 0.15mm (0.006 in.).

Valve clearance TM Racing- Photo 9

9 - Use a thickness gauge (17) to check the play between the exhaust cams (18) of the intake camshaft (14) and the valve pad is 0.20 mm (0.008 in.).

If the valve clearance noted is within the values ​​shown, go to step 23.
Otherwise, go to step 10

Valve clearance TM Racing - Photo 10

10 - Unscrew the screws (19) of the clamps (20) and (21).

Valve clearance TM Racing - Photo 6

11 - Remove the clamps (20) and (21).

Valve clearance TM Racing - Photo 12

12 - Remove the camshafts (13) and (14).

Valve clearance TM Racing - Photo 13

13 - Lift the rockers (22) and remove the pads (23).

Valve clearance TM Racing - Photo 14

14 - In case it is necessary to replace the spring of the valve lifter pin, work as follows: After dismounting the exhaust camshaft (1), unscrew the screw (2) and remove the plate (3).

Valve clearance TM Racing - Photo 15

15 - Extract the spring (4) and the pin (5); check the status of the pin (5), replace if worn / ruined. Replace the spring (4) and remount all the components working in the opposite direction.

Valve clearance TM Racing - Photo 15

16 - Mount a comparator (1) on the head and position the piston at top dead centre, rotating the crankshaft via the closed-end spanner (2).

Valve clearance TM Racing - Photo 17

17 - Before remounting the camshafts, check that the gasket (3) is not worn, replace it if necessary.

Valve clearance TM Racing - Photo 18

18 - Mount the intake camshaft (4) and the exhaust camshaft (5) so that the tuning points (6) are parallel on the edge of the head.

Valve clearance TM Racing - Photo 19

19 - Mount the clamp (7) by inserting the centering pins in their corresponding seats.

Valve clearance TM Racing - Photo 20

20 - Remove the comparator (1).

Valve clearance TM Racing - Photo 21

21 - Mount the clamp (8) by inserting the centering pins in their corresponding seats.

Valve clearance TM Racing - Photo 22

22 - Screw the screws (9) alternately without tightening, then tighten the screws with a tightening torque of 10 Nm (1,0 kgm, 7,37 ft/lb).

Valve clearance TM Racing - Photo 22

23 - Check that valves play is correct (see “Valves play check” paragraph). Spread some LOCTITE sealing paste onto the surfaces of the two crescents (10). Check that the gaskets (11) and (12), located on the head cover (13), are not worn. Replace them if necessary

Valve clearance TM Racing - Photo 24

24 - Mount the head cover (13) by screwing the screws (14) crosswise and then tightening them with a torque of 10 Nm (1 kgm/ 7.37 ft/lb).

Valve clearance TM Racing - Photo 25

25 - Mount the spark plug (15).

Valve clearance TM Racing - Photo 26

26 - Check the gasket (16), replace it if worn, then remount the plug (17)screwing it with a tightening torque of 5 Nm (0,5 kgm, 3,69 ft/lb).

Your tm 250 fi mx, tm 300 fi motorcycle is ready to ride again. The tm racing engine is perfectly adjusted. All you have to do is open the gas on the whoops of your favorite track or on the woods next weekend.

Look at all our other tutorial :